So, here is the thing, February is in the winter, Looe is in Cornwall, I go on holiday to Looe in February, why is the weather always so good?
Last month I spent the warmest February days on record in Looe walking on the beach and The South Coast Path.
I took a section of my cameras to document things, my iPhone 6 128GB camera with the Rode Micro attached, the DJI Spark drone and an old GoPro Hero3. I have hours of material from the week, this video is from a short section of a walk along the rock pools to Millendreath and the Black Rock beach café.
Look out for more or watch more stuff on the YouTube channel.
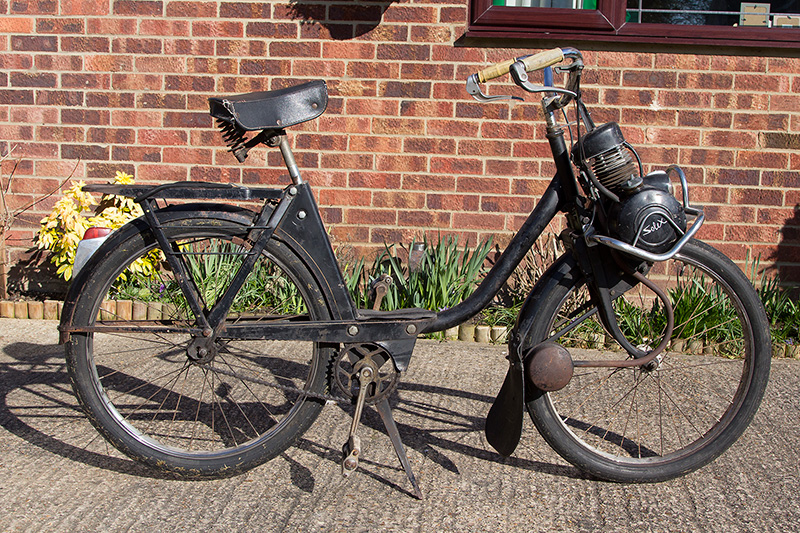
Spring is in the air, well at least it has been, perhaps it still is. Time for the Velosolex 2200 autocycle to get its registration plate and take a road trip.
Last weekend in the sunshine I spent a few hours fixing the small problems, it runs very nicely now and I can’t wait for the registration number to arrive.
In order to get the UK registration I need to have a dating certificate, thankfully the DVLA have an arrangement with a local owners club that can issue the certificate, thanks to my friend Alan Course I am now a member of the EACC ‘East Anglian Cyclemotor Club’. I have submitted all of the required information and paid the small fee, just waiting to see what happens next.
Insurance is already in place, Bikesure have insured the Velosolex on its frame number. They don’t have frame numbers but 5 minutes with a set of number metal punches and a hammer produced a reasonable frame number to be going on with.
This is not a restoration of a Velosolex 2200, it is simply a registration and repair process to get the bike fit for a few trips around wherever I might be, will look great on the back of the fire engine.
Of course there is a video of the thing that have been going on…
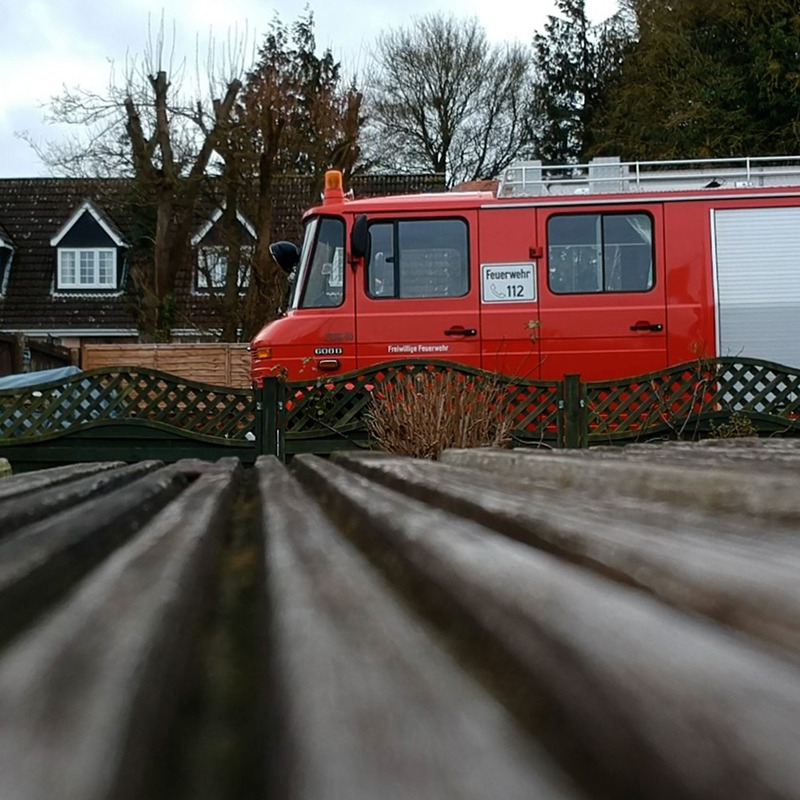
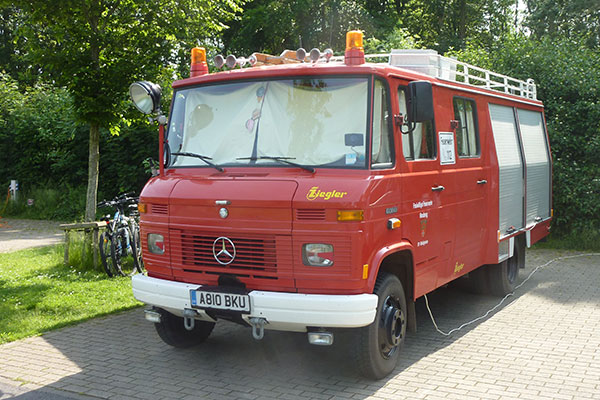
The work to convert and refine the fittings on the German Fire Truck, regularly posting updates on my progress and then a couple of videos about the trips last summer has meant that I had yet to finish the first video, the film I made when I collected the Mercedes Benz 608D Fire Truck from Kempen in Germany.
The video takes me from Cambridge via EuroStar to Brussels and then on to Aachen and finally Kempen. Each day was an early start. Travelling back through The Netherlands loaded with enough German beer to see me through the conversion and a few clips of the first night camping in Alblasserdam.
I took the ferry from Hook of Holland and arrived in Harwich in the early morning sunshine in late September 2017.
There are many more videos in this story, all on my YouTube channel.
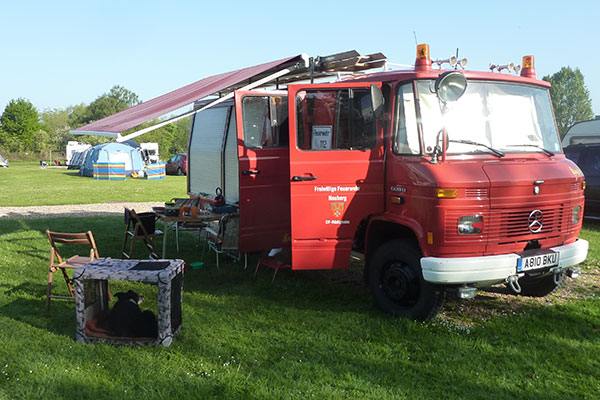
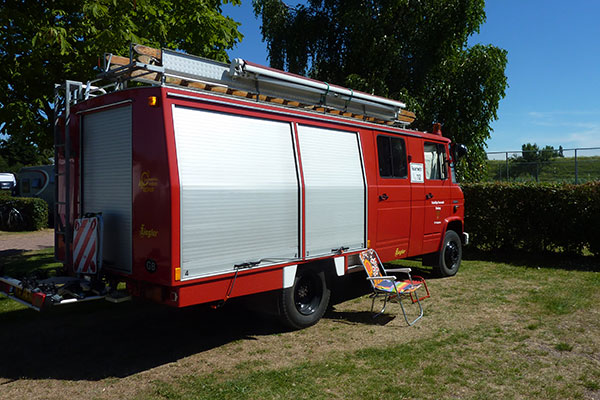
There have been quite a few small jobs to do on the converted German Fire Truck over the last few months, nothing very significant, mostly refinements and minor modifications to what has already turned out to be a great fire engine camper conversion and an amazing space to be in while travelling and camping.
The diesel heater arrived but was damaged so that has now been returned, this has caused some delay in fitting and perhaps a couple of missed opportunities but it will happen, the replacement is here and I will be able to fit it soon enough. Will make some video of that, not another ‘here is a diesel heater’ video but a video showing where I have installed it and why.
The first road trip of the year is almost here, 10 days in April to the south of France, lots of video to come from that including the now mandatory drone material.
All work on the ‘Turkey B’ has been put on hold, there has been some work to do on the Renault 4, I say work to do but really it’s been more learning that work.
I have become more aware that the suspension on the front end of the Renault 4 is not what it should be. I have changed the upper wishbones and all shock absorbers but the front driver side has been low and often reaches the lower extent of its travel all too often.
How to Fix it – Reset the front suspension, measure and adjust, that involves removing the two front torsion bars.
It must be said that removing the front torsion bars is not difficult, dangerous or anywhere near as much of a specialist job that everyone on the internet makes out, no special tools are really required and even the most ardent couch mechanic should be able to do this work with only a basic tool kit, a basin wrench and a trolley jack.
I have read a lot about doing this work and I was sure there was some black magic to it and approached it with a sense that it might all go very wrong. Over the last few weeks, working one day at weekends, we have found that all of the ‘How to’s’ online are one kind of bodge or another, some are just wrong.
The torsion bars on my car had been off before, badly adjusted and the rear boss adjusters damaged.
This is not a ‘How to’, this is the way I approached it and found it to work.
It’s my opinion that the only way to adjust the torsion bars on the front is to first totally disassemble the entire front suspension, that means releasing the lower ball joint, track rod end, tie rod, brake calliper, loosen the bolt at the front of the lower wishbone (it’s easier to do this when the bolt is under some load, it’s a French bolt, with only one end) and drive shaft, this will enable the hub assembly with the brake disk to be removed from the car.
At this point the wishbone is only lightly loaded.
I decided after looking at the torsion bar adjusting boss tapered nut that it needed a tool, a normal basin wrench ground down lightly to fit the taper is more than strong enough to unload and load the torsion bar.
After reading that this could be done on a ramp with all manner of complex nonsense tools and hocus pocus I wasn’t sure if this could be done even with the wheels on or not, but here is the big question… How do you know how much to adjust?
There are some bits written about how much to adjust, splines here and there but everything I have read fails to mention that you actually need to know a kind of ‘day one’ or ‘zero level’ of the torsion bars before you start, well in my case I did as they had been poorly adjusted and I would suggest that if you are going to do this work you make a point of ‘zeroing’ the torsion bars before adjustment if you don’t know how they are set to start with.
How did Renault do it? Maybe nobody knows, this is what I did….
First of all, if there was a French Heath Robinson, he surely would have done it this way.
First of all, soak each end of the torsion bars in penetrating oil, WD-40, GT85 or something, but soak each end, did I say soak each end, make sure you soak each end, plenty of lubrication.
Leave it for 30 minutes and soak them again, the more you can soak them the easier this is.
While you are waiting for the soaking to ‘happen’ it’s time to position the car. No need for a ramp or anything magic, I just jacked the car up so it was about 40-50cm off the ground, small ramps to the rear and wooden blocks under the floor at the front. Soak the torsion bar ends while you think about how to position the car.
With the car positioned simply strip down the front suspension, so the lower wishbone can be lowered to its lowest point against the chassis, the torsion bar are all but unloaded now. Use you new basin spanner on the torsion bar boss, one end on the boss and the other on the cup of a trolley jack, looking from the rear of the car, add a little pressure on the spanner with the jack by jacking it upwards in an anti clockwise direction for the left side and clockwise for the right.
Next, I slid the front seat forwards and loosened all of the bolts. First problem we ran into was that the bolts had been cross threaded so they resisted the ratchet a little but an impact wrench worked well. I just took all of the bolts out as the basin wrench had the tension under control. Release the jack under the car and the torsion bar relaxes.
At the front end, hit the lower wishbone beside where the torsion bar enters, soak some more and keep hitting, I found a metal club hammer was the tool of choice here. Occasionally, as the torsion bar drifts backwards we had to tap it back into the wishbone and start again, this allowed for more soaking and more drifting until it all came out.
I didn’t mark anything at all, no need, it was all filthy and needed a good clean on the wire wheel.
After a bit of paint and a few new parts, ball joint and plenty of grease it was time to put it all back together. The torsion bar goes into the lower wishbone first, I added copper grease, plenty of it, just in case.
The bit I decided was important was to know how the car sat on the ground if I extended the lower wishbone as far as it would go then fitting the boss on the rear of the torsion bar and fitting it into its correct location within the car, vertically aligned, as if adjusted up. I did this and of course reassembly is quite simple, just a trolley jack under the lower wishbone to work again the tension of the torsion bar. We did this on both sides.
Once everything is back together and the car lowered it’s quite easy to tell how low the car is and how much adjustment is required, the car looked ok really but I wanted it a little higher.
Remember, my car had been damaged somehow so things needed a little care. The drivers side I decided need the rear boss rotating three splines and the passenger side one spline.
It’s even more important to remember here that everything you read, perhaps including this is wrong. You don’t rotate the torsion bar, you first need to understand its ‘zeroed’ position and the increase its torsion by repositioning the boss at the rear and adding tension, don’t take it out of the lower wishbone any more.
So, back on the small ramps and blocks, strip down the front suspension again, everything comes apart easily as there is plenty of grease on everything. Release the torsion bar tension then ONLY remove the boss from the rear, this can be done with a centre punch under the car. I turned the boss three splines in the clockwise direction (anti-clockwise for the right side boss) when viewed from the rear and then fitted the boss back on the torsion bar and into its retainer.
Now it’s time to add some tension to it. We used the basin wrench again and making sure the lower wishbone is fully extended a little pressure added to the basin wrench with the trolley jack soon added the right amount of rotation to line top the bolt holes (our job would have been easier of we had good bolts and good bolt holes.).
It’s worth remembering here that even a little rotation adds significant tension to the torsion bar, adjusting three splines needs a rotation of about one eighth of a turn, nothing more than that and certainly not a scary amount of pressure.
Again, reassemble the front end and lower from the health and safety proof ramps and blocks, stand back and admire the work, the car is level.
This turned out to be more about learning what was happening rather than difficult, quite simple really and only a few basic tools, I seem to remember there are only about ten nuts to remove at the front end and four at the rear, so hardly a lot of work.
If this was once your car and you know that you tried to adjust the suspension I have to tell you you didn’t know what you where doing and you made a terrible job, we have addressed that and it’s back to how it should be.
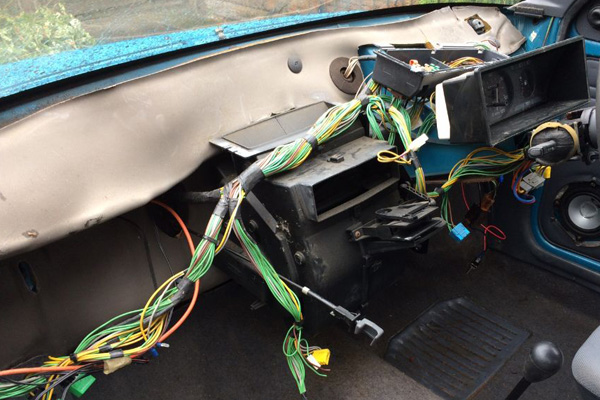
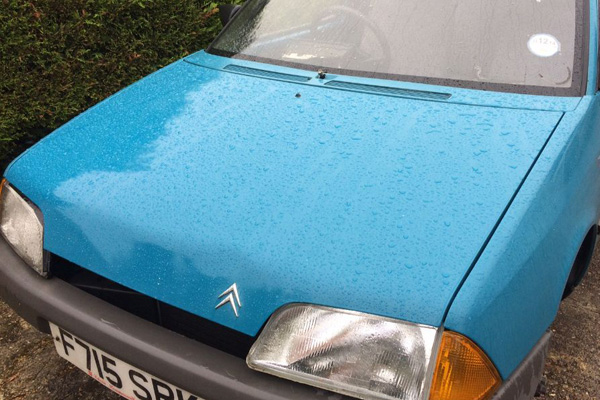
The Citroën AX project continues, this week has been all about cleaning and removing stuff from the car to ready it for the replacement parts. I have found out that there are only 11 AX 11 RE models on the road at the moment so I am still thinking this is worth saving.
Most of the dashboard has suffered from the UV degradation, to the point that when I got the car most of it was missing anyway, replaced with cardboard boxes. I have sourced a replacement dashboard, it has some UV degradation but not as much, I have managed to salvage it and with the help of some fibreglass and time I now have an almost complete dashboard that will fit in two parts, top horizontal section and then vertical facia, it’s a work in progress with no doubt many compromises and perhaps some wood sections to cover the cracks…
Outside, well, lots of cleaning, some dent removal and then more cleaning. The roof bars are off at the moment, then need some work to get them back to useful, that will be done but for now it’s all about cleaning. The bonnet has been mopped with some Farcela G3 compound and there is actually paint below the faded mist, will have to do the whole car but that is how it is, it will look fine with some polish.
The wheels, I have thrown out the two remaining broken wheel trims and have decided to refurbish each wheel with some thorough cleaning and then matte black paint, they may have trims on in the end but for now the wheels are starting to look good.
The current spend is around £250.00 for everything and some meticulous work, it’s coming along nicely believe it or not…
The summer trip is over, it was quite a trip taking in the Port Eliot festival in Cornwall, a ferry from Poole to Cherbourg and then a couple of weeks exploring the Carentan peninsular of Lower Normandy and a drive back across northern France and home from Dover.
Great weather, some good food, some not so good food and a camper that covered nearly 2000kms without a problem.
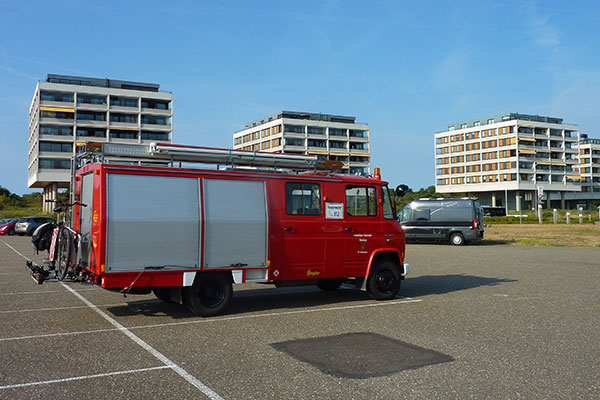
It’s been 51 weeks since I set off for Kempen in Germany to collect the Mercedes Benz 608D Fire Engine, it’s been quite a year, over the autumn and winter I spent a lot of time converting it into a camper and spring and summer have been busy with 30+ night away in the UK and Europe. Turns out that the 608D was an excellent buy, the vehicle itself is in first class condition, a few front brake issues but they seem to be resolved now with some extra work to make sure the shoes move together. After 4000kms I have changed the oil for 5w30 synthetic and cleaned up the filters, should be good for another 800,000kms now.
I have know the Citroën AX for a number of years, driven by Steve and full of stories about faults and failures. He has decided to but another car so I gave him £100.00 for the AX, it’s know as the ‘Turkey B’, so that name will stick.
I am the 11th owner of the AX, it’s done about 65,000 miles and needs a lot of work, there are only 11 left though, it’s a rare car.
Look out for more posts about the Citroën AX and all of the other stuff that I am doing at the moment here, on Instagram and Twitter over the next few months.
Wow, it’s been a very busy four or five months. I have been away so much in the fire engine that I have had no spare time to update this stuff, so many conversations with so many people, emails to deal with an the odd show and meet too. I have posted quite a few bits on Twitter and some pics on Instagram too, some more things here, here is the run down….
The registration documents came back before the end of March which meant that I was able to drive the fire engine on the road as a camper van before I had planned, basic idea was to get it road legal for Easter but it was all done early.
First trip was a few days a Dobbs Weir near London, all went well and we tested everything.
Next trip was a few days in Montreuil sur Mer in France in May, a round trip on the Eurostar for a few days, all good too, had to explain the whole idea in French a few times but it was all fine.
Late May we went to Belgium by ferry and back through France, this trip was the first time we had rain, good news, no leaks or drips and there was no condensation problems either, the fire engine turned out to be a great place to be when it rains, the sound of the rain on the roof is great.
In July I went on a road trip through France, Belgium and Holland via Dover and back from Hook van Holland to Harwich, took the bike and did some rides around Vorne and Putten. The trip was just sunshine and 35 degree temperatures, sleeping in the van was fine and with all that sun the blackout curtains really helped with the early morning sun.
Later on in July we set of on our summer road trip, first to Cornwall then over to Lower Normandy via Poole, probably around 1800kms with no real problems, a few little bits to deal with, loose bumper, bent tow bar drop plate but nothing more serious, there is a video of the road trip coming up…
Now back in Cambridge I have Summer Update video…. enjoy.
Last couple of weeks has been spend finishing, well, almost finishing the kitchen, beds and as much of the interior as necessary to finally call the fire engine a ‘motor caravan’ in the eyes of the DVLA for import and registration purposes.
Now, a ‘motor caravan’ has a Class 4 MOT, so as the fire engine is 6500kg gross weight it is technically a HGV and would normally require a HGV MOT test. As a ‘motor caravan’ it will become a Private HGV and require only a Class 4 MOT and crucially £165.00 a year road tax, and of course the import fee this time too, £55.00.
The kitchen section is basically complete, just need a few finishing touches, the handles and catches on the doors, lighting and some switches to the pump and fridge would be good but basically that is done. The rear bed is done, mattress on and very comfortable too. Dining area with four seats is complete, I made a new table out of 12mm ply and a 1970s caravan table leg from eBay, that is ‘secured to the wall of the vehicle’ and can be removed if required.
You can watch the progress here, this is not a ‘how to use tools’ video, rather a ‘this is what happened after I used tools’ video.
28 February 2018
The big day. Snow, wind and ice happened this week and all of the advice was to not travel. Thinking about the fire engine, it would be the only chance I had to use the new winter snow tyres that are fitted to their full potential so I just had to go for the MOT.
Setting off it was apparent that the snow tyres did exactly what they suggested, it was if the snow wasn’t even there, up hill, down hill, breaking etc all done without any issues at all.
We arrived for the MOT in good time, in a bit of snow storm, heaters working very well and lovely and dry and warm inside. The fire engine got a lot of attention, lots of photos and the MOT chap even played with the flashing lights and sirens. Soon the test was over, passed of course, why take something that will fail to a MOT? We collected the paperwork and set off for home, another snow covered ride but good fun.
Paperwork has now been completed and send for registration. None of the German efficiency now, we are in the hands of the DVLA, took 5 minutes to register for export from Germany, probably 5 weeks to register for import in the UK, if I am lucky.