Mercedes Benz 608D Fire Engine Camper – Interior Stuff

It seems unlikely that I haven’t posted anything on the site for over a month now, it’s been such a busy time on working on the fire engine, buying even more bits and pieces and building things, some of the bits have been on Twitter… Here come an update on the works over December.

Most of December in Suffolk has been cold, many days have started with frost and some with snow, when it has been milder it has usually been raining so much of the work has been inside the fire engine or inside the workshop.

One job that I have spent some time on is converting the original rear facing fireman’s seats into a pair of seats to go opposite the rock and roll bed to complete a 4 seat dining area, the seats also need to fold away when the bed is needed. To do this I needed to find a large section of 12mm ply to act as a back board support for the mini project, this came from the original partition wall, it’s good structural ply and happens to be painted in the same colour as the rest of the truck. The three seats where trimmed down to two and an elaborate folding leg contraption was devised and attached to support the seats when in the seating position. A little bit more fettling and the seats where fitted, they work well and fold away very neatly.

As it was so cold outside I though about insulation, this turned out to be a time consuming task, loads of aluminium bubble foil insulation installed, then covered with another layer of synthetic vehicle insulation, rather like a 2 inch rockwell but designed for automotive insulation, all fixed to the roof with contact adhesive and hope. I had originally though of covering the ceiling with hardboard but that didn’t look good, it felt like being inside a cardboard box so ply wood was the answer. Looking at the structure within the roof I knew that it was not going to be a simple job to cut a few large sheets and fit it. The main structure of the roof is basically level, the problem is there are so many additions to the inside of the roof, roller shutter mechanisms, runners and supports, the chances of a long run of ply wood are very slim. In the end I have opted for a sort of jigsaw approach, adding larger sections where possible and then filling the gaps and spaces, bridging sheets and voids with other sections of ply or machines timber to get a completely covered and insulated roof lining, this will now be an on going part of the project, the roof is lined with the larger sections, so are the rear walls but the smaller more fiddly parts can be done any time, no rush for that, there is more to do.

Yet another small job has been to add the seat belts, on the face of it an 8 bolt job, oh no! I had bought a 3.5m seatbelt for each side at the front, they eventually fitted ok and are long enough and secure enough. I couldn’t find much information about the belts a truck of this type would have had new, they appeared to have adjustable belts but not inertia reel  belts. One major issue was the passenger seat, there was nowhere to secure the belt buckle so I had to fabricate and weld a plate onto the seat base, straight forward enough and I even managed to use some of the thicker steel plate that I removed from the rear of the fire engine.

During a brief spell of cloudy weather I fitted the new old stock Britax Fog Light, it’s a period fog light, just need to run the cable for that to the front and find a 24v bulb for it, the fire engine came from Isabe with about 30 bulbs, so should be one there somewhere.

On a cold bright day with snow all over the place I decided it was a good idea to make my way onto the roof to put the blue beacons and siren back together, it turned out to be a simple job and Isabe had labelled all of the connections with some coloured tape and supplied all of the original screws and washers. The Martin horn was connected in the same way and then IT ALL WORKS, the siren is SO loud, I love it. This was clearly the wrong time to do this work, I was quite excited about it and forgot about the cold, then my fingers became so cold and painful I could hardly move them, back to the workshop for a warm up.

Another job I had been waiting to do was to remove the vinyl covering the original signwritting, this actually came off quite easily and it’s great to have the original wording on the doors, only a small amount of paint came off and I will fix that when the weather warms up.

Watch the video of the progress here….

Mercedes-Benz 608D Fire Engine – Rock and Roll Bed

A couple of weeks ago the new custom rock and roll bed arrived for the fire engine conversion.

Before I could move it into place I needed to finish the work on the floor, fitting a few extra sections of 12mm plywood with the help of some Sikaflex 221. This finishes the centre section of the floor, there are some areas that need finishing at each side but as they will both have different functions I need to finish those in a different way.

I have installed some bubble insulation on the rear walls, here I used non-adhesive insulation, it works quite well and is easy to push into the more tricky voids, some is stuck on with aluminium insulation tape. Most of the areas have two if not three layers of this stuff, should keep the temperature up or down depending on the outside temperate, will also reduce the general ‘rumble’ of the metal panels.

The rear walls, new partition and sides to the kitchen are 9mm ply, spent some time measuring and cutting the sheets to fit the angles of the bodywork, this proved to be quite easy and then became much harder. Cutting with the circular saw, finishing and varnishing the ply is straight forward, cutting and fitting around the numerous bits and bobs of roller shutters, metalwork and straps is something else, this will surely be a longer job that I though, more on that in the next video.

With all of the major messy work in the fire engine complete I cleaned it up, swept out the dust and accumulated other crap from the grinder, saw, drill and sander then washed it all.

Time had come to get the new rock and roll bed into the back, it’s quite heavy and reasonably awkward to move, not to mention that it had to be moved inside while in the ‘flat’ position. We decided to take the upholstery panel off, that was a great idea, with some cardboard and blankets on the floor the bed frame was soon inside, a few screws replaced and the bed in there. The seating position is perfect, just the right height, same as the front seats, and the view out of the panoramic front window is great..

Watch the progress here….

This last weekend was spent with a roll of self adhesive insulation, heater and worklight to insulate the many voids in the roof of the rear section, not a spectator activity really, just repetitive measuring, cutting and sticking, a few clips of that in the next instalment…

Now for more painting, cutting and fixing plywood here and there, probably a bit more cleaning too.

Fire Engine Camper – Fitting The New Floor

Although it’s been referred to as a Fire Truck I think it’s time to use the English description for it, it’s Fire Engine, so there we are, a new name.

Last week I got hold of the plywood for the floor and other dividing walls, spent some time measuring, cutting and sanding the boards to fit the forward section of the living area.

The original floor in this area was mostly made from 12mm plywood anyway, no sign of a metal sub floor, the smaller area to the rear where the partition wall once stood was only 5mm checker plate, so it all had to be levelled and insulated.

I chose the aluminium bubble insulation for the job, seems to offer some good insulation for the minimal thickness. I used some aluminium tape to secure the edges, a good staple gun to fix it in place and some careful trimming to make it fit. The smaller area was raised a little with some off cuts of 9mm ply and secured with Sikaflex EBT+, solid but slightly flexible.The same treatment to the wheel arch to make an insulated secure base for fix the furniture to.

Once it was all fixed I gave it a light sand and a cost of Ronseal exterior varnish for a real watertight seal.

Watch the progress here….

Fire Truck – Preparing For The Conversion To A Camper

Spent the last two days finishing the strip out of the fire truck in preparation of for the conversion into a camper.

Last week I cut most of the metalwork out from the rear section, this week I have cleaned up all of the exposed metalwork, welded a few joins here and there are generally prepared things to accept the timber and insulation.

Under the front passenger seat was a box on rails unit, previously used for some fireman kit or other, probably just sandwiches I would think, this has now been relocated to the rear of the truck, just under the bed and opening onto the ‘camping side’ of the truck. ‘Camping Side’, well yes, if you have a continental style camper the door to use for camping is on the right hand side of the vehicle, so is the awning, this makes it easier to park up and face the same way as everyone else on the camp sites, not much of a problem but if space is tight you might find yourself facing ‘awning to awning’ with someone and that is not always good.

The floor at the rear had all kinds of corrosion from machinery, glue and other sealants on it so I cleaned it with a wire brush attached to an angle grinder and then removed any residue with some synthetic thinners (don’t use the two at the same time (health and safety tip)), then some warm soapy water to finish off, all nice and clean now.

One of the big jobs was to cut the bumper irons that supported the pump off, this was quite straight forwards if a little time consuming. First the two sections of bumper had to be removed, then all of the lighting and tow eye U bolts, this eventually revealed enough space for the 9″ grinder to do it’s work. Before cutting I cleaned the area with some degreaser and washed it down, this meant it was wet, so no sparks causing issues there. With the irons cut down to size and a little cleanup they bumper was sprayed black, now it needs to go back together. As the bumper was off I decided to look at the motor, it’s 3.7L, 19000kms and looks almost new.

The main bed frame has also been installed, it’s just a little longer than a UK double bed but the same width, about 35cm of the bed of the truck to allow for storage. Now I need to cut and prepare the plywood bed base with integral insulation and fix it to the frame, this completes the main bed build.

Next is lining out the rear with insulation and plywood, installing the 12v lights and 240v sockets, waiting for the arrival of the Rock ‘n’ Roll bed and the construction of the kitchen.

Fire Truck – Removing the Furniture

Day Two – the day started with the fire truck containing two rows of seats, a partition wall and a thin checker plate covered plywood floor. Much drilling, cutting and grinding revealed the amount of space that there really is inside. A lot of the aluminium is scrap but there will be a good deal of it reused here and there to build the camping interior.

Watch the progress here…

Fire Truck – Removing the Pump – Video

Work started last weekend on the fire truck, after much discussion it was decided that the pump needed to be removed for the MOT. Quite simple to remove, a few bolts and a couple of hoses, then the throttle cable that joins the main linkage, then remove the extra ‘bumper’ for the pump. This all leaves two large box sections that need to be removed with a grinder.

Inside the rear of the truck I have removed all of the screws, bolts and other fixings to then take out the racks, mounts and other metalwork that was once used to support the equipment. The floor is now free from any screws or bolts, just some steel uprights to remove and rework.

Take a look…

The Story of my Renault 4

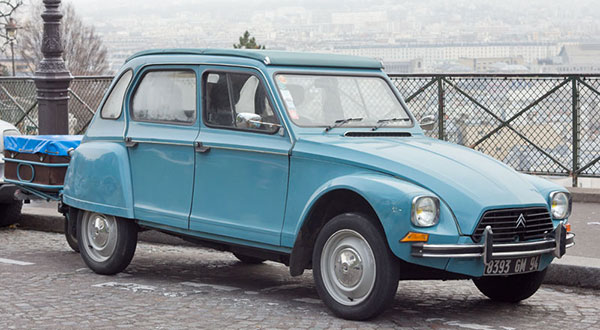
Why did I want to buy a Renault 4? In January 2014 I was sitting in a cafe in Montmartre during the winter Paris classic car tour Vincennes en Anciennes watching the normal selection of old Citroen 2CVs and Dianes, Fiat 500s, obscure Italian sports cars and a variety of old British classics driving through the square, I wanted something that was different but still cool but I didn’t know what that was. I took a photo of a Citroen Diane which I really liked but couldn’t get away from the memory of driving to London in the early 80s, screaming down the motorway in a 2CV holding on to the roof, wasn’t much fun, I also have a soft top buggy so I wanted something with a solid roof!

Citroen Diane Montmatre 2014

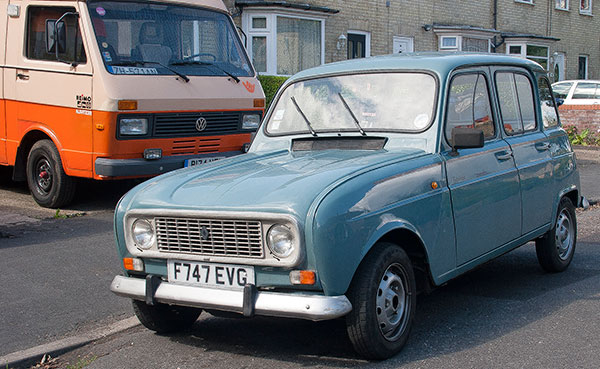
I also decided that I wanted something useable, not just an occasional car, something I could use everyday that was practical, robust and fun. Eventually I decided that car was a Renault 4. The Renault 4 seemed basic enough, something that could be repaired with a few basic tools, simple design, agricultural engineering and not to fussy.

There didn’t appear to be very many for sale in the UK, most of what I came across on the internet where either to far gone for sensible repair or owned by enthusiasts who seemed to be trying to hard. Eventually I found one that was reasonable local and described on a Renault 4 website as a ‘Classic French Car’, there where lots of pictures of the car during it’s ‘restoration’ and it was now for sale. I made arrangements to see the white Renault 4 and went off to see it. I have been involved with VWs for about 30 years now and have seen the scene grow from the 1980s minority interest to what it is today, I wasn’t prepared for the Renault 4 world at all and found that it attracts some rather odd people, the owner of the white Renault 4 was the first….

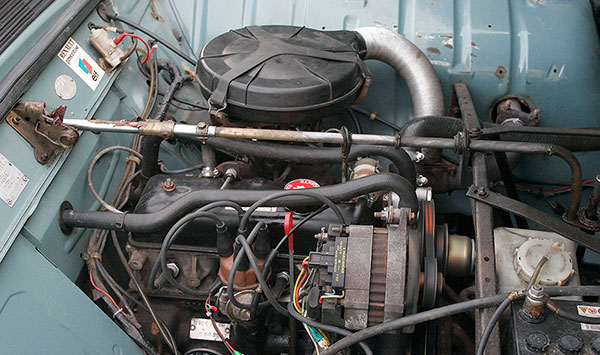
I arrived to look over the car, it all looked good from the outside, not to bad for a mid 80s car, typical random coloured fluffy seat covers on the inside etc. The seller was apparently a Renault 4 expert with a website so I was in luck. I had a look underneath to see the condition of the floor, it had been welded with strange shaped plates here and there, probably gasless mig welding, the spatter was everywhere and the job clearly not done very well, the plates where not painted and had take on a lovely brown rust colour. The engine sounded OK and looked clean enough but after about 10 minutes running on idle as we discussed the price I noticed that there was a steady stream of oil coming from around the rocker cover, the expert told me that ‘they all did that’ to which I replied ‘surely they only do that when there is something wrong?’, this is when the seller seemed to take offence at my identification of the ‘bad points’ and decided that the car was not for me. I was happy with that, an oily rusty car for good money is not what I was after, I went home.

I know a thing or two about buying and importing cars from Germany, the T25 that I have talked about in the past came from Karlsrhue and the three day train and road trip to get it was a great caper so I took a look in Germany. I found a chap called Chris in Freiburg im Breisgau, a city that I know quite well and I though I knew where his car lot was. He had a large selection of Renault 4s from France all for sale. I kept an eye on the listings he had and made a plan to visit in August to take a look.

While looking for a car I found one car that came up a for sale a few times, once in Norfolk, then South Wales then Burnham on Crouch. I had had a chat with the seller of the car when it was in South Wales but decided he wanted more for the car than it was worth, I had a number of pictures of the car and though that is was structurally OK but probably need some minor cosmetic work. It eventually came up for sale again in late July shortly before I was going to Germany, it turns out a German bloke had bought it from South Wales and decided it was not for him.. more on that later…

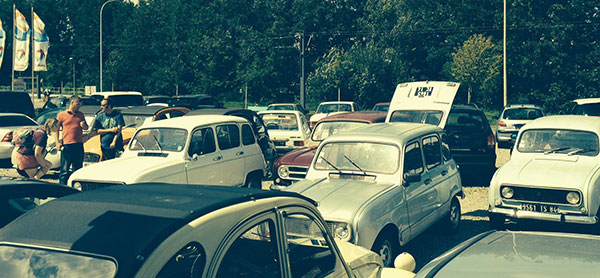
In August I visited the car lot in Freiburg to look at the Renault 4s, I had decided that I would buy one if there was one that was solid and sound enough for me to drive to the UK on export plates. There where some great looking cars, a 1970s chrome bumper model was very nice but all far to expensive, some around 10000 euros. I decided to try and buy the car I had seen for sale in the UK, so while in Freiburg I made contact, arranged a price and a day to view and collect the car from Essex.

Later I found that he had takes some pictures of me looking at the cars, this one I found on his web site.

Visit to the Renault 4 in Freiburg

The day for the trip to Burnham on Crouch came and I set off with a one way ticket and a pocket full of money. When I arrived at the station I saw the car waiting for me, it looked exactly as I had hoped and I recognised the car from the other times I had seen it for sale, the pictures I had of the car where good and the car was as good as I had hoped. We went for a drive in the car and it was clear that it was structurally sound but there was something odd with the mechanical side, it rattled everywhere and was running quite poorly, starved of fuel I though. Looking over the paperwork I was satisifed that everything was OK, French and UK paperwork seemed in order but there was no MOT certificate, we checked online and it had 11 months MOT, so I decided to buy it and drive it home, just as well as I had already insured it. While inspecting the car it was clear that the was something wrong with the issuing of the MOT certificate, apparently no advisory notices on the MOT. I am not an MOT tested but I don’t think one bald tyre, one missing windscreen wiper, the lack of rear brakes and only one working headlight are grounds for passing a test, clearly a dodgy MOT.

The drive back to Cambridge was great fun, wonky steering, lack of power unless at full throttle and the rattling sounds from all over, but really good fun, what a crazy car and just what I wanted. On the trip I made the decision that I would drive the car for a month before doing anything to it, just to see if it kept going and find out what was going to fall off. During the month I made an exhaustive list of all of the work that I needed to do to make the car as good as it could be, anyone who knows my other cars knows how well maintained they are, they are not all shiny and perfect but they are mechanically excellent and so far totally reliable as a result. The list went on and on, five new tyres, four new shock absorbers, new disks and pads, new shoes and wheel cylinders, new read wheel bearings, new front upper wishbones, new windscreen wipers, replacement front indicator / sidelight holders, new headlamps, new water pump, new exhaust, new fuel pump, carb repair kit etc. etc. I spent hours looking for new old stock parts on Ebay from all over Europe and a steady stream of parts arrived for bargain prices. I set about fitting all the parts.

Renault 4 Engine

Before I bought the car I had though that I would use some local classic car and specialist Renault garages to do some of the work that I didn’t have time to do, so the first job for the local classic car garage was to fit a pair of new Firestone tyres to the back of the car, investigate the torsion bar rattle on the right side of the car and, as they have a ramp, inspect and replace where necessary the lower wishbone bushes and find out why it was running poorly. This is where the real classic car garage comes into it’s own, experts doing expert jobs. Alas, not this classic car garage, they failed to find the problem with the torsion bar, they failed to fix the play in the lower wishbone bush and only found lesser branded tyres. It appears from the cars in their garage that they only change lightbulbs on Triumphs. I moved on.

A month or so later it was snowing, I decided to ask a local Renault specialist to source and replace the rear brakes as I had not had time to remove and inspect them to find the problem, perhaps they could look at the torsion bar probles too, I had sorted out the front wishbone problems myself. After a week in the specialist garage they couldn’t identify the rear brake shoe manufacturer and could see no problems with the torsion bar. I asked for a picture of the brake shoes, obvious what they where to me as soon as I saw them and I ordered a new kit from Lyon, arrived in two days. I collected the car and we fitted the brake parts, job done. So much for the local experts.

Over the winter I fitted all the parts I had sources myself, the waterpump was a bit of a problem and I had to find a thermostat with the correct temperature. The hardest part to find was the full lenght single section exhaust, none of the UK suppliers had one, I found one in Germany and one in France but the shipping was impossible, the package was to long. I planned a trip to Le Touquet for a few days to get an exhaust but before I booked the crossing I managed to find a full lenght exhaust in the UK by using the OEM part number, it was listed on Amazon for £19.99 including delivery, it arrived next day in a 9 foot box!

Renault 4 Carbureta Refurbishment

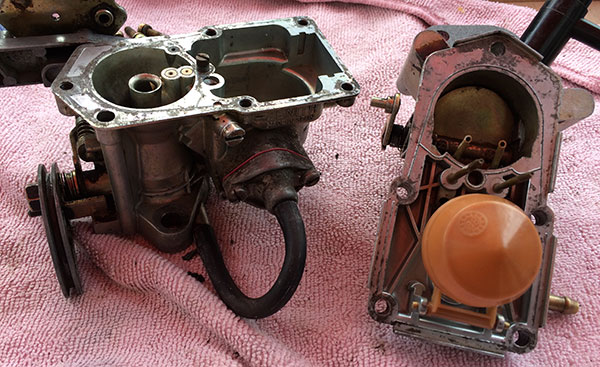
I solved the problems with the poor running by refurbishng the carbureta with a 15 euro kit from Germany that I fitted in about an hour, then adjusted the mixture and timing by ear, no need for any expensive kit, when it sounds right, it’s right.

In May I took the car to my local garage for it’s MOT, I was sure it would be fine and it was, it passed with no advisories at all, I was very happy with that, all the cars I considered stated that they that had ‘passed with flying colours’ or ‘flown through the MOT’, all rubbish, a car passes or fails the MOT and mine had passed, only passed and the emissions where in the normal range.

A couple of weeks ago while trying to work out how best to remove the front torsion bars without personal damage I came across a French Renault 4 workshop manual that had a description of the process, my loose translation of the bit about rebuilding the suspension after servicing it was that you should ‘take care to replace the rubber collars on the torsion bars as they could not be fitted when the bars where installed in the car’ (basic French to English). Rubber Collars? I couldn’t immediately see those on my car in the same place as the ones on the line drawing in the manual… I found that the ones on my car had worked their way to the very front of the torsion bars and where up agains the anti roll bar. Some further lying down under the car, looking and measuring I decided that the passenger side of the car had a slight dip in the floor pan, just enough to cause the torsion bar to come into contact with it during normal driving, in fact there was some minor wear on the floor pan as a result and it was quite shiny. I cleaned the torsion bars up a little with some WD40 and found I could slide the rubbers back to the correct position but the floor was causing the rubbers to get squashed. I got a few bits of timber and made a yoke around the torsion bar, lifted the car with a trolley jack with my dad keeping a close eye on the floor pan, at what seemed like a great height there was a loud pop and the floor pan went back into shape, I let the car back down and took a look at the torsion bar, there was enough clearance and I could secure the rubber collar in position.

Now when driving down the road the sounds of that Salvation Army playing tambourines in the passenger seat are a thing of the past.

VW Buggy Renault 4 at the Thurlow Fair

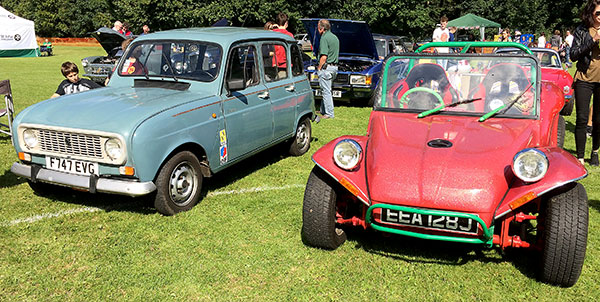
For anyone considering a Renault 4, you will find a ready supply of ‘new old stock’ parts on Ebay both in the UK and elsewhere in Europe for very little money. My advise is not to read any of the Renault 4 forums, they are all full of the normal enthusiasts who will always tell you you are doing it wrong and their way is the only way. It seems that everywhere you go someone will want to talk to you about the car, they had one, their parents had one, their geography teacher had one, they learned to drive in one, so much to talk about, I took the Renault and the VW Buggy to a show a couple of weeks ago, plenty of interest in both and lots to talk about.

Enjoy.

DIY Wind Turbine – WindBlue DC-540


Having a look at the videos I have on my YouTube channel and found that this one has just clocked up over 125,000 views. I posted it in late 2009 and the viewing has been pretty consistent since then.

The original Description Text read “This little film shows the making of a wind turbine that is based around a WindBlue DC-540 PMA. The turbine was made in two days using some great tools and with a clear plan in mind. It is currently mounted on a 4m mast with three guy wires. Output is connected to the battery bank via a diode. Charge control is handled by a Xantrex controller and dump load. Maximum unloaded voltage is 68v, not measured the current yet. This is not a WindBlue endorsed video, I am simply a customer who ordered the DC-540 from their web site and had it shipped to the UK.”

I have had numerous emails from viewers and many responses direct to the YouTube page and it made me wonder why the people who respond even bother. Looking at the responses it seems that I have got it ALL wrong, there are so many suggestions on how to make it better, faster, bigger, more efficient etc. The fact the I made the turbine with an off the shelf alternator from the US and some scrap I found lying around AND when it was on a turbine mast in my garden it ACTUALLY PRODUCED POWER seemed to have passed everyone by. While I can appreciate that some degree of optimisation is a good idea it is not worth getting to technical about it to the point where you actually don’t make anything, sure refinements are a good idea but you can only take so much power out of the wind before a stall, consider everything but MAKE SOMETHING!

There have been a number of responses from viewers who like the approach and to them I thank you for your interest, you are the people who will probably get something out of the film, perhaps they have all made under performing, inadequately sourced, poorly constructed wind turbines, but al least they may have had a go at making one and learned a lot along the way.

The real problem for me is when the experts wade in, I find this along the way with all of my projects and interests, the fetishisation of the items, the construction methods, the components used, the tools etc is all pointless, the fact that I made the item and got it working is enough for me, it does what I wanted it to do. After almost 6 years the exact same turbine is still on a mast, producing enough of an output and combined with a couple of other doubtless under performing poorly designed turbines with dodgy unoptimised blades to run an electricity meter in reverse while connected to an inefficient grid tie inverter, but it does the job and the bills are lower as a result of it.

Long Time No Talking To You…

Well, that is what my Japanese mate Yukio used to say. It has been a long time since I have added anything here, the last year or so has been a year of change for us here in Cambridge and it’s time for some retrospective documentation of those changes, developments and all the fun that comes along with it.

The last year has been full of creativity, changing a few vehicles here and there, making stuff, fixing stuff and travelling with many trip to Cornwall, France, Holland and places in-between. There is the story of the VW LT Camper to tell, to update where I left of with that. The story of the Renault 4 and all the people I have met along the way with that, the story of the Beach Buggy and the minor refit after 25 years of ownership. The change from T4 to T5.1 and another new VW joins us, just today.

This week sees the arrival of the long due Allotment album, ‘Songs From Meadow Long’, more on that to come too along with some other band news.

For now though, here is a picture of the Renault 4, the day it arrived in September 2014.

Renault 4 Savane in Cambridge